
Webots is a software for fast prototyping and simulation of mobile robots. It has been developed since 1996 and was originally designed by Dr. Olivier Michel at EPFL, the Swiss Federal Institute of Technology in Lausanne, Switzerland, in the lab of Prof. Jean-Daniel Nicoud. Since 1998, Webots is a commercial product and is developed by Cyberbotics Ltd. User licenses of this software have been sold to over 400 universities and research centers world wide. It is mostly used for research and education in robotics. Besides universities, Webots is also used by research organizations and corporate research centers, including Toyota, Honda, Sony, Panasonic, Pioneer, NTT, Samsung, NASA, Stanford Research Institute, Tanner research, BAE systems, Vorverk, etc.
The use of a fast prototyping and simulation software is really useful for the development of most advanced robotics project. It actually allows the designers to visualize rapidly their ideas, to check whether they meet the requirements of the application, to develop the intelligent control of the robots, and eventually, to transfer the simulation results into a real robot. Using such software tools saves a lot of time while developing new robotics projects and allows the designers to explore more possibilities than they would if they were limited to using only hardware. Hence both the development time and the quality of the results are improved by using a rapid prototyping and simulation software.
Overview
Webots allows you to perform 4 basic stages in the development of a robotic project as depicted on the figure. The first stage is the modeling stage. It consists in designing the physical body of the robots, including their sensors and actuators and also the physical model of the environment of the robots. It is a bit like a virtual LEGO set where you can assemble building blocks and configure them by changing their properties (color, shape, technical properties of sensors and actuators, etc.). This way, any kind of robot can be created, including wheeled robots, four legged robots, humanoid robots, even swimming and flying robots! The environment of the robots is created the same way, by populating the space with objects like walls, doors, steps, balls, obstacles, etc. All the physical parameters of the object can be defined, like the mass distribution, the bounding objects, the friction, the bounce parameters, etc. so that the simulation engine in Webots can simulate their physics. The figure with the simulation illustrates the model of an e-puck robot exploring an environment populated with stones. Once the virtual robots and virtual environment are created, you can move on to the second stage.
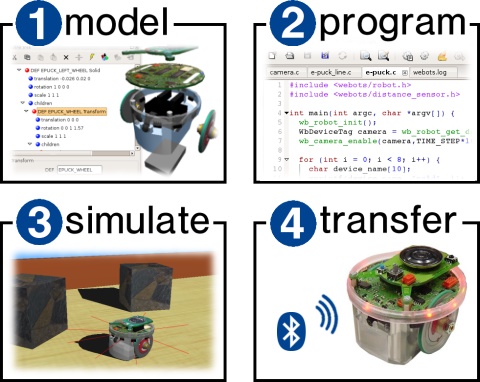
The second stage is the programming stage. You will have to program the behavior of each robot. In order to achieve this, different programming tools are available. They include graphical programming tools which are easy to use for beginners and programming languages (like C, C++ or Java) which are more powerful and enable the development of more complex behaviors. The program controlling a robot is generally a endless loop which is divided into three parts: (1) read the values measured by the sensors of the robot, (2) compute what should be the next action(s) of the robot and (3) send actuators commands to performs these actions. The easiest parts are parts (1) and (3). The most difficult one is part (2) as this is here that lie all the Artificial Intelligence. Part (2) can be divided into sub-parts such as sensor data processing, learning, motor pattern generation, etc.
The third stage is the simulation stage. It allows you to test if your program behaves correctly. By running the simulation, you will see you robot executing your program. You will be able to play interactively with you robot, by moving obstacles using the mouse, moving the robot itself, etc. You will also be able to visualize the values measured by the sensors, the results of the processing of your program, etc. It is likely you will return several times to the second stage to fix or improve your program and test it again in the simulation stage.
Finally, the fourth stage is the transfer to a real robot. Your control program will be transferred into the real robot running in the real world. You could then see if your control program behaves the same as in simulation. If the simulation model of your robot was performed carefully and was calibrated against its real counterpart, the real robot should behave roughly the same as the simulated robot. If the real robot doesn’t behave the same, then it is necessary to come back to the first stage and refine the model of the robot, so that the simulated robot will behave like the real one. In this case, you will have to go through the second and third stages again, but mostly for some little tuning, rather than redesigning your program. The figure with two windows shows the e-puck control window allowing the transfer from the simulation to the real robot. On the left hand side, you can see the point of view of the simulated camera of the e-puck robot. On the right hand side, you can see the point of view of the real camera of the robot.